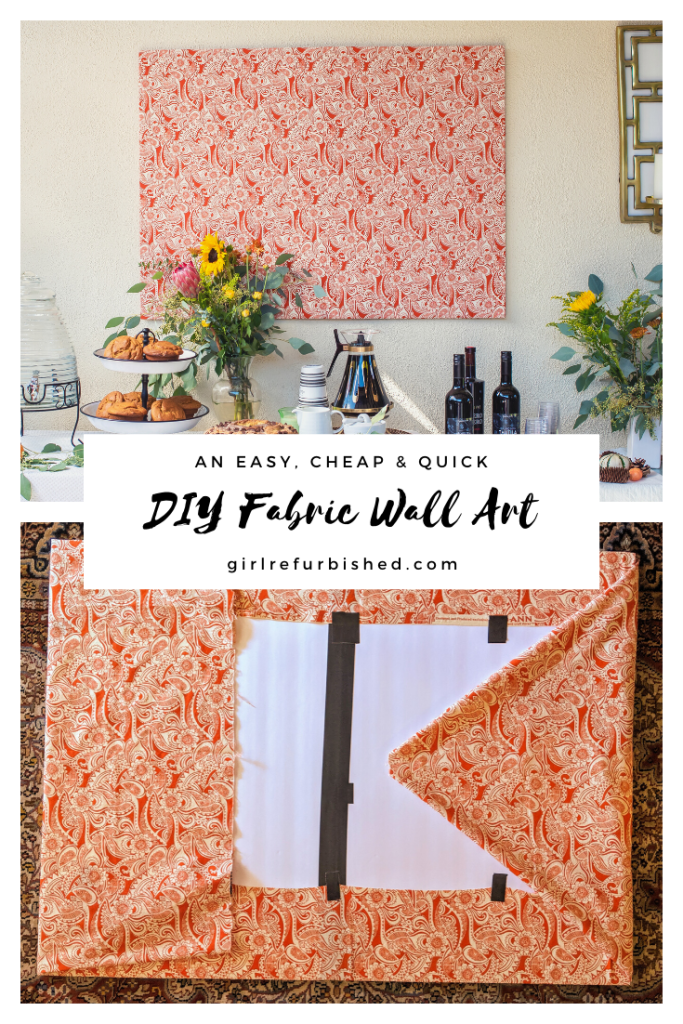
Let me explain how my DIY fabric wall art came about. I was hosting my Fall Ladies Brunch, and I needed a large piece of artwork to be hung outside above my dessert/bar cart area. That means it was going to be affixed to the outside of the house with no nails. Which means I needed to use my favorite hanging tools: 3M Command Strips.
But I didn’t have any artwork and I didn’t feel like spending extra money for a one day event. And that’s when I decided to make my own, DIY Fabric Artwork with poster boards. And because it looked so nice I ended up using the artwork on my fall mantel!
You can head to the IGTV video of me walking you through pretty much the entire process – it’s crazy easy. This certainly isn’t the fanciest DIY ever but it’s super affordable, quick and crazy customizable!
How to Create It
Let’s jump into the making of this DIY fabric artwork. You obviously can pick up fabric from a fabric store but I actually had this fabric on hand. It was left over from our wedding! So that means it’s been moved from house to house, unused for almost nine years. That’s the kind of person I am. I liked the fabric, and I wasn’t going to part with it!
First thing you’ll need to do, is cut your fabric to size. I didn’t want to cut mine, and it happen to fit over the poster board so you’ll see I have a lot of extra fabric. But what you’ll really want to do is cut the fabric or pick up the exact amount at the fabric store – 50″ wide x 40″ tall.

Next, iron your fabric. You sure as heck don’t want wrinkles. So make sure to iron to your fabric’s specific needs. In this case it was cotton and we used the cotton setting.

Now you’ll need to take two poster boards, picked up from the dollar store, and tape them vertically together with heavy duty masking tape. You’ll have a 40″ wide x 30″ tall piece. Now if you’re looking for a really long horizontal piece, then tape them that way. I placed three small pieces of tape along the boards first to make sure they were even.

Then, I covered that with one large, single piece of tape. Do not fold the tape over the edge. You don’t want to have a bump on the sides, on the finished piece.

Place the fabric, face side down onto a clean surface. Place the taped poster boards evenly on the fabric. You’ll have five inches of fabric on each side.
Time to fold. Fold the fabric on the wider sides over the poster board. Tape down one side, about 6 -8 inches apart, with heavy duty masking tape.
While taping the second side gently pull the fabric inward to make sure you’re getting a clean, smooth, tight finish. You don’t want fabric to be hanging down!

Now fold over the shorter sides. You can fold them two different ways. Like you’re wrapping a gift, or a slight tuck in. Which ever way you choose you’ll need to make sure the fabric is smooth, and not bunched up, in the back as well. Otherwise the wall art will bow and not lay flat against the wall.

I went with the slight tuck in on each side. Next, you’ll need to tape down the sides. Make sure the fabric is taped to the poster board for a firmer grasp. But you’ll also need to tape the fabric to itself on those edge pieces. Pulling tightly to ensure a clean finish.

Lastly, if you’re hanging the DIY fabric wall art, you’ll add the 3M command strips. I prefer you go with the Command medium sized picture hanging strips. They have Velcro and are slightly larger. It just makes life easier when removing. Or if it’ll only be up for the day, like I had, get get the regular strips without Velcro and apply liberally. The poster part is where the strips will be the strongest.

Now hang it! Here it is at my fall ladies brunch hanging outside on the stucco of the house!

And once I took it off I leaned it against the wall, no strips, as decor on my fall mantel!

DIY Fabric Wall Art

MATERIALS
- Two posters boards – approx. 20″ wide x 30″ tall each
- Fabric – 50″ wide x 40″ tall, five extra inches per side
- Iron
- Heavy duty tape
- 3M Command Strips
INSTRUCTIONS
As always, it’s best to read the extra details I’ve put under each photo above for more details and tips on the instructions. Also, check out the IGTV video for a quick walk-through.
- Cut fabric to size – 50″ wide x 40″ tall.
- Iron fabric. Set your iron to your fabrics setting, probably cotton.
- Take two poster boards, lay them vertical next to each other so you have one large 40″ wide x 30″ tall. Take heavy duty masking tape and place three small pieces of tape along the boards first, making sure they’re even.
- Next cover the seam with a large, single piece of tape. Do not fold the tape over the edge – you don’t want to have a bump on the sides of the finished piece.
- Place the fabric, face side down onto a clean surface. Place the taped poster boards evenly on the fabric. You’ll have five inches of fabric on each side.
- Fold the fabric on the wider sides over the poster board. Tape down one side, about 6 – 8 inches apart, with heavy duty masking tape.
- Fold the opposite side down, while gently pulling the fabric inward to make sure you’re getting a clean, smooth, tight finish.
- Now fold the small sides in. Either like you’re wrapping a gift, or a slight tuck in. You’ll need to make sure the fabric is smooth, and not bunched up, in the back as well. Otherwise the wall art will bow and not lay flat against the wall.
- Tape down the sides. Make sure the fabric is taped to the poster board for a firmer grasp. But you’ll also need to tape the fabric to itself on those edge pieces. Pulling tightly to ensure a clean finish.
- Attach the Command medium sized picture hanging strips.
- Hang it up! Or lean it against the wall on a mantel or shelf.


I love this idea! it will come in handy when my kids stop using certain special blankets. I can make some wall art for them!
Back at you! What a super cute idea Tanya!
I LOVE how simple and classy this looks! My husband and I have actually been having some heated debates about what to do with our brick mantel space now that our living room reno is almost complete, so this could well be the answer we’ve needed!
That’s awesome! It’s such an easy and quick way to get a large piece up. Good luck with the living room!
This is super cool and how you can use all different kinds of patterns and colors.
Yes that’s my favorite part! You can change it to fit whatever!
What a neat, inexpensive way to decorate. It is nice to have some affordable decor.
Yes! Affordable is always good!
I love this decor idea! I’m always trying to figure out how to display different fabrics, I can’t wait to try this!
I love DIYs and this was such a pretty and simple DIY. Thank you for the idea!
I like the idea. Anything to make life easier and done, I’m definitely with it.
I just love how it looks like. What an amazing idea. I have to look for doing it in our house as well